In the realm of interior design, the kitchen has solidified its status as the heart of the home. It’s where culinary magic happens, where families gather, and memories are made. To elevate the aesthetic appeal of this vital space, homeowners are increasingly turning to bold design choices, with one standout option being the bright red tile backsplash. Infusing vibrancy and energy, a red tile backsplash can transform a mundane kitchen into a dynamic and inviting space. In this comprehensive guide, we delve into the allure of bright red tile backsplash, its design possibilities, installation techniques, maintenance tips, and more, to help you unleash the radiance in your kitchen.
.
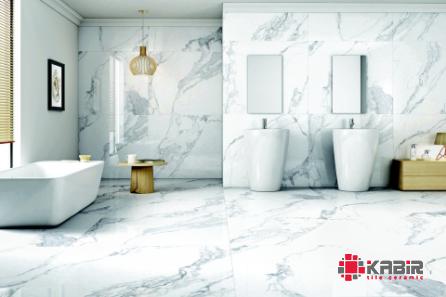
 **The Captivating Allure of Bright Red Tile Backsplash** When it comes to color psychology, red is the undeniable champion of intensity and passion. It symbolizes energy, courage, and a zest for life. In the realm of interior design, red is a bold choice that commands attention and adds a touch of drama to any space. A bright red tile backsplash serves as a focal point, injecting warmth and personality into the kitchen environment. Imagine a sleek, modern kitchen with stainless steel appliances and minimalist cabinetry, offset by a vibrant red tile backsplash that exudes a sense of playfulness and creativity. Alternatively, in a traditional kitchen with wooden accents and classic elements, a red tile backsplash can bring a contemporary edge while maintaining a sense of warmth and coziness. The versatility of red tiles lies in their ability to enhance various design styles, from eclectic and bohemian to industrial and glamorous.
..
 **Design Possibilities with Bright Red Tile Backsplash** The beauty of bright red tile backsplash lies in its ability to adapt to a wide range of design schemes, creating unique and visually striking kitchen spaces. Here are some design possibilities to explore: 1. **Monochromatic Elegance**: Pairing a red tile backsplash with white cabinets and countertops creates a classic and timeless look. The contrast between the bold red hue and the crisp white elements adds a touch of sophistication to the kitchen. 2. **Industrial Chic**: In an industrial-inspired kitchen with exposed brick walls and metal accents, a bright red tile backsplash can introduce a pop of color and modernity. The combination of raw textures and the vibrant red hue creates a harmonious blend of industrial and contemporary aesthetics. 3. **Mediterranean Vibes**: For a Mediterranean-inspired kitchen, combine a red tile backsplash with rustic wood cabinets, wrought-iron fixtures, and earthy tones. The rich red color of the tiles complements the warm and inviting ambiance of a Mediterranean kitchen, evoking visions of sun-drenched landscapes and vibrant markets. 4. **Bold Contrasts**: Embrace the drama by pairing a bright red tile backsplash with dark cabinets or black granite countertops. The striking contrast between the deep, moody tones and the vibrant red creates a visually captivating space that exudes confidence and style. 5. **Pop of Color**: If you prefer a more subtle approach, consider adding a red tile backsplash as a pop of color in an otherwise neutral kitchen. Whether it’s a small section behind the stove or a full backsplash, the touch of red adds visual interest and personality to the space.
…
 **Installation Techniques for Bright Red Tile Backsplash** Installing a bright red tile backsplash requires precision, attention to detail, and the right tools. Here’s a step-by-step guide to help you achieve a flawless installation: 1. **Preparation**: Start by preparing the surface where the tiles will be installed. Ensure that the wall is clean, dry, and free of any debris or grease. If needed, apply a suitable primer to create a smooth and stable base for the tiles. 2. **Layout**: Plan the layout of the tiles to ensure a balanced and visually appealing design. You can use spacers to maintain consistent spacing between the tiles and create clean grout lines. 3. **Cutting Tiles**: Use a tile cutter or a wet saw to cut the tiles to fit around outlets, corners, and edges. Measure carefully and mark the cuts before proceeding to ensure accuracy. 4. **Adhesive Application**: Apply a thin layer of tile adhesive to the back of each tile using a notched trowel. Press the tiles firmly onto the wall, ensuring even coverage and alignment. 5. **Grouting**: Once the adhesive has dried, mix the grout according to the manufacturer’s instructions. Apply the grout using a rubber float, pressing it into the spaces between the tiles. Wipe off excess grout using a damp sponge before it dries. 6. **Sealing**: To protect the grout and tiles from moisture and stains, apply a sealer after the grout has cured. Follow the sealer manufacturer’s guidelines for application and curing time. 7. **Finishing Touches**: Install trim pieces along the edges of the backsplash to achieve a polished and cohesive look. Caulk any gaps between the tiles and countertops to prevent water infiltration. By following these installation techniques with care and precision, you can ensure a professional and durable finish for your bright red tile backsplash.


Your comment submitted.